ads

Slider[Style1]

Style2

Style3[OneLeft]

Style3[OneRight]

Style4

Style5

Safely clean the Registry with Auslogics Registry Cleaner

Let’s be honest: I’m not a big fan of Registry cleaning tools. Through the pages of Support Squad I’ve seen first-hand the damage they can do to perfectly functioning Windows systems.
They’re often billed as a magic cure for problems or promise performance improvements, but if you scan blindly and let a Registry cleaning tool simply delete everything it finds you’ll eventually run into trouble – and you won’t notice any speed boost either.
Despite all this, Registry cleaning tools can help fix problems by tracking down rogue entries and deleting them – the trick is knowing how to use them carefully.
In this tutorial, I’ll show you how to selectively search for, analyse and remove entries. Just as importantly, I’ll also reveal how to put them back again should your clean-out create more problems than it solves.
Safely clean the Registry with Auslogics Registry Cleaner

Install program

First, install Auslogics Registry Cleaner from your free disc. During installation you’ll be prompted to install Auslogics BoostSpeed alongside it; we recommend unticking this box. The next screen will offer you additional programs – verify ‘Custom install (advanced)’ is selected, with no additional boxes ticked, to skip installing them all. Click Next and the program will install.

Take precautions

Before proceeding any further, take a System Restore point: open the Start menu or press [Win] + [Q] to open the Search charm in Windows 8. Type ‘system restore’ and click ‘Create a restore point’ under Settings. Click ‘Create’, give your Restore point a suitable name and click ‘Create’ again to set up a fail-safe backup which you can restore should it prove necessary.

Pre-scan checklist

Switch back to Auslogics Registry Cleaner, then open the Settings menu to verify ‘Back Up Changes’ is ticked. The left-hand pane reveals which areas of the Registry have been selected for scanning – right-click this column and choose ‘Check Safe Only’ to ensure only safe areas are ticked for now. Once done, click the ‘Scan Now’ button and wait while the scan is performed.

Results overview
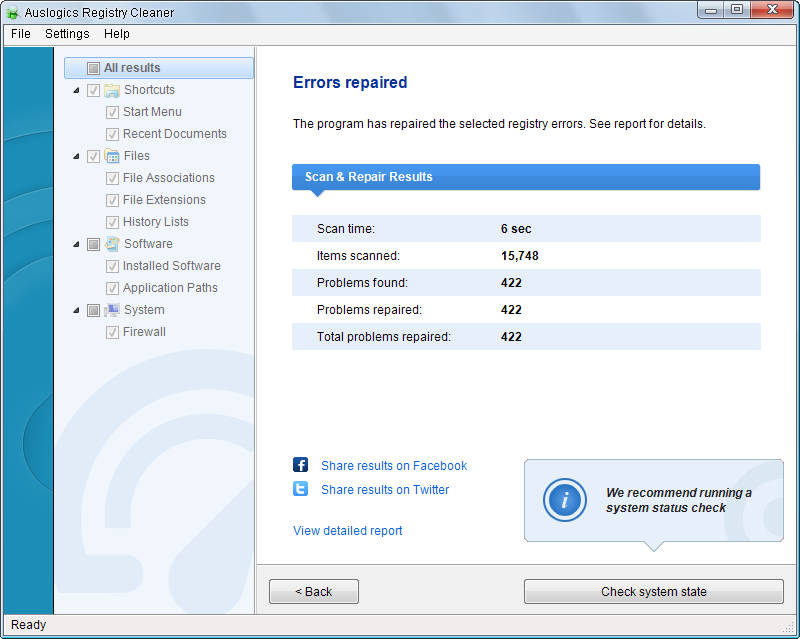
clean the Registry with Auslogics Registry Cleaner Don’t be alarmed at the hundreds or even thousands of ‘errors’ it finds – many of these can be left safely in place without any impact on your computer’s stability or performance. The results divide these into their parent categories; again, don’t worry about the levels of severity assigned to each section – remember that most of these errors have no detrimental effect.

Explore in depth

Use the annotation on the previous page to help identify problem entries. Most entries should yield some clue to their origin. Look for references to a specific program, or click the ‘Google it’ button to perform a search using that Registry keyor value, which may throw up people with similar problems and – if you’re really lucky – potential solutions to try.

Select all and repair
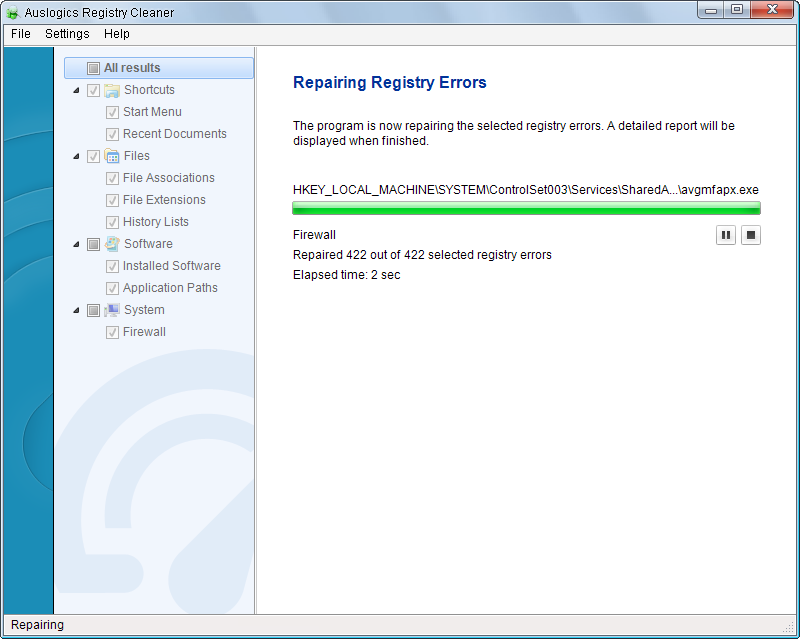
Safely clean the Registry with Auslogics Registry Cleaner By default, all problems are selected – clicking ‘Repair’ removes them all. If you’re unable to identify a specific Registry entry that you believe is causing your problem you could – with some risk – try removing them all. Click ‘Repair’, then reboot and analyse to see if the problem has gone. If it hasn’t, or other problems emerge, jump to step nine to restore the backup.

Be selective

Alternatively, right-click ‘All results’ and choose ‘Uncheck all’ to select nothing by default. Now manually place a tick next to the entries you wish to remove. When you’re done, verify ‘Back Up Changes’ is ticked, then click ‘Repair’ to remove only those entries you’ve selected. After the repair completes, click ‘View detailed report’ to see exactly what was deleted, if necessary.

Search for Registry keys

Select ‘View > Find Registry Keys’ to perform a manual examination of the Registry for keys to examine and potentially delete. Use the ‘Filter’ button before clicking ‘Search’ to restrict your search. Note that Auslogics Registry Cleaner provides no indication of whether a key is a problem or not; it simply returns all results. Manually select entries to delete, then ‘Clean up’.

Restore keys

Should you run into new problems after cleaning the Registry, select ‘File > Rescue Center’ to browse available backups and Restore points. Start by right-clicking your most recent backup and choosing ‘Restore’ – click ‘Yes’ to restore all deleted entries from that backup (you can’t choose single entries). If this fails to work, select ‘Restore Points’ and your System Restore file.

Registry cleaning made easy

Armed with these tips, you should now be able to safely remove Registry entries when the need arises – advanced users can go even further and include more ‘dangerous’ sections of the Registry, including ‘Missing Software’ and ‘Shared DLLs’, when scanning for problems. Note that indiscriminately cleaning these sections could cause major problems, so proceed with caution.

Read ebooks using Icecream Reader

Ebooks are a lot more convenient than printed matter (although obviously paper magazines are still fine, we’re bound to say). They’re a lot lighter for one thing – a bagful of hardback books can seriously weigh you down. 
While a fully loaded e-reader isslightly heavier than an empty one, due to the extra weight of trapped electrons in the storage media, it’s only in the region of a billionth of a billionth of a gram: not something that’s going to perturb even the strictest airline baggage allowance.
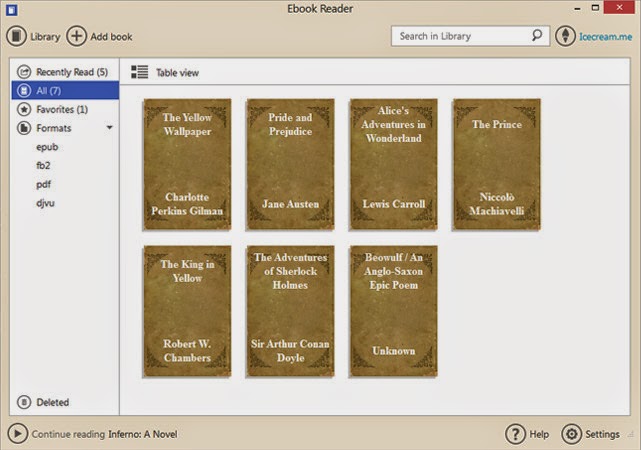
If you’re carrying a laptop, an ebook app for Windows is even lighter. Amazon’s Kindle app ties you in to the company’s ecosystem, but for non-Kindle owners who want to read ebooks on their PCs, the choice is a little broader. Here, we’ll show you how to discover the world of ebooks using the free Icecream Ebook Reader app.

Read ebooks using Icecream Reader

Get some books

Read ebooks using Icecream ReaderThe open EPUB ebook format is supported by many booksellers, including Waterstones and Barnes & Noble, but not Amazon. Many free classic and self-published titles are available in this format. Some ebooks are also available as PDF files, which ebook readers can also open. Out-of-copyright classics are available from Project Gutenberg (www.gutenberg.org).

Install Ebook Reader

Point your web browser to www.icecreamapps.com/Ebook-Reader and download and run the installer. Once done, run the app either by double-clicking its icon or by ticking the ‘Launch Icecream Ebook Reader’ box on the installer’s final page. It’s not a large application, but be aware that a library of ebooks can take up a decent chunk of space.

Add titles to library

Your library is empty to begin with. The app doesn’t have a store from which you can buy books, so they need to be downloaded manually to your hard drive. It’s a good idea to save them in an Ebooks folder within Documents, so that they’re easy to manage, and so you can be sure they’re processed by any backup program you use. 
Use this simple, free ebook-reading app to enjoy literature from different periods and countries from the comfort of your PC.

Read it!

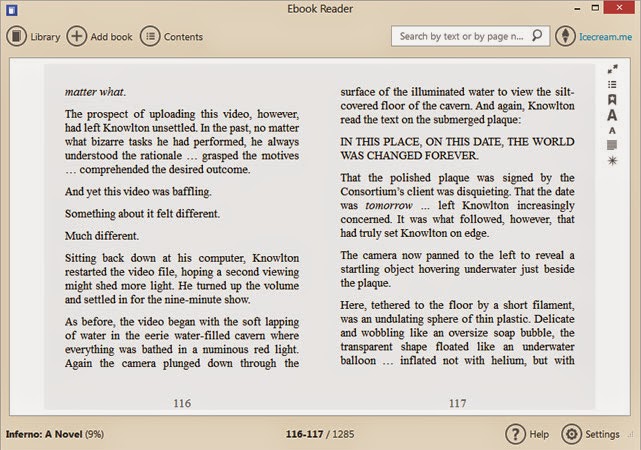
Read ebooks using Icecream ReaderFind somewhere comfortable to sit, make a cup of tea, and settle in to read. Navigating an ebook is easy. A click on the right edge of the page or a tap of the spacebar takes you forward a page. Click the left edge to go backwards. Alternatively, use the left and right arrow keys, Page Up and Page Down, or the mouse wheel. The Home and End keys jump to the start or end of a book.

Settings

Access Ebook Reader’s settings page by clicking the cogwheel icon at the bottom-right of the window. There are just two options. The bottom one sets the language in which the app is displayed, while the top enables you to choose a colour scheme: white for daylight, dark blue for night, and a sepia that’s closer to daylight but easier on the eyes over long periods.

Bookmarks

Bookmarking works just like its paper counterpart. When reading a book, click the icon with a star on it (towards the upper-right) to add a bookmark. You can manage bookmarks, or jump straight to a bookmarked page, by clicking the ‘bullet list’ icon at the top-right of the window. To search for text, type it into the box at the top of the window and press Return.

Other controls

There are additional controls alongside those for bookmarking. The top icon switches to full-screen mode. The capital ‘A’s change the text size, while the paragraph icon toggles between one or two columns of text. Narrower columns are easier to read, but a single wide one can help if pictures take up much of the page width. The last icon controls the colour scheme.

Delete a book

Removing a book from your library within the Ebook Reader app doesn’t remove it from your hard drive but does make it unavailable to read until you add it again. Go to your library, switch to Table view and click on the dustbin icon in the book‘s row. A dialogue will ask if you’re sure. If you are, click the OK
button to get rid of the incriminating evidence.

Read great comics for free

Dynamic and stylish, comics are a fantastic way to enjoy a story, with the dialogue, narration, art style and perspective all playing a part in developing the world and its characters. Finding great comics used to mean trawling through the crowded shelves of a (sometimes gloomy and strangesmelling) shop, but the Comics app by ComiXology puts them all at your fingertips, wherever you are.The app features over 30,000 comics and graphic novels from publishers including Marvel, DC and Image (the people behind X-Men, Superman and Spawn, respectively). You'll also find a wealth of comics by smaller publishers, making it a great way to find new titles and fresh ideas.Best of all, ComiXology’s app works on all your Windows 8 devices, so you can start reading one on your PC, then finish it later on the train using your tablet. Let’s get started!
Read comics for free

Get the app 

Open the Windows Store and searching for ‘ComiXology’.A few apps will appear, but you want the first in the list – simply called ‘Comics’. Select it and click ‘Install’. The app and many of the comics are free, but there are also paid-for titles available, so you can choose to set up payment options. When the app has installed, a notification appears at the top right. Click to launch it.

Find free comics 

The first time you open the app, you’ll see a notification asking if you want it to run in the background and place status notificationson your Lock Screen. Have a think and choose an option. You’re ready to choose somethingxp to read. There are lots of tempting new releases on the home screen, but let's start by selecting ‘Free comics’ and picking from the titles here.

Once you’ve read a comic, remember to rate it to help other app users decide whether to take the plunge .

 Get a preview

You’ll only see six free comics listed at first, but there are dozens more – use the arrow button beside ‘Recommended freebies’ to see them. Once you see one that takes your fancy, click it and you’ll be taken to its product page, which shows you its credits, publication date, number of pages and more. There’s also a brief description, followed by a preview.

Make an account 

Click the button labelled ‘Free’ to add the comic to your shopping cart, then click the cart icon at the top-right and select ‘Checkout’. You’ll now be prompted to create an account for the app, so enter your details. The email address you enter will be used to send you notifications when you buy and download new comics. When you’ve finished, click ‘Create’ and log in.

Enter card details (but don’t pay!) 

Although you’ve chosen a free comic, you’ll still be taken to a billing page and asked to enter credit card information. Don’t worry, your card won’t be charged – this step just makes it easier if you want to splash some cash in the future. Enter your details and click ‘Proceed’. The transaction will be processed and you’ll see a page featuring all the comics you own. Click ‘Read’.

Turn the pages 

Now the fun begins. You’ll see the cover of your comic with an arrow to the right, which you can click to turn the page. If you have a Windows 8 tablet, this would be a great time to start using it; holding the display in your hands and tapping the screen is much more like reading an actual comic book than clicking a mouse button.

Get dynamic

Double-click (or double-tap) the page you’re reading to enter Guided View. This is a brilliant feature exclusive to ComiXology’s app, which zooms in on sections of the comic in the same way your eyes would move if you were reading it on paper. It’s not available on every issue, but when it is, it’s a dramatic way to read a story.

Thanks to Comics by ComiXology, it’s never been easier to get a slice of the comic-book action.

Know your options 

Right-click the black background and three icons will appear in the bottom right: ‘i’ for information, ‘?’ for help, and a book icon that reveals a storyboard at the top of the screen, enabling you to hop quickly between pages. What did Superman say on page four? Ah yes, the knife was Kryptonite! At the top left you’ll see an arrow that will take you back to the app’s home page.

Browse and discover 

One of the best things about ComiXology’s app is how it simulates the experience of browsing through shelves of comics and flicking through the pages of whatever catches your eye. Choose a series and every book will appear on screen at once.If you enjoy one, it’s easy to go back and find the next in the series – and the next, and the next…

Fill your virtual shelves

Congratulations, you now know everything you need to download and enjoy world-class comics from some of the biggest (and smallest) publishers in the business. Many are free and even the paid-for ones rarely cost more than $10, so it’s an easy and affordable way to build up an impressive collection. And all without setting foot in a little shop smelling of musty carpet…

Partition your hard drive

In many hard drives, your documents, photos and music are saved to the same area where your Windows operating system and software are located. Defragmentation can help organise everything, but having all your personal files crammed alongside Windows can really slow the whole system down. The process of partitioning solves the problem, enabling your Windows operating system on the hard drive and software to be digitally fenced off on a streamlined virtual hard drive. 

Partition your hard drive
Windows 7 itself can create a partition, but MiniTool Partition Wizard (www.partitionwizard.com) is a free alternative software that’s more advanced, yet easier to use.Once installed and loaded, notice the bar graph representing the available space on your hard drive. Right-click on the section where OS and your files and software are stored (usually the C: drive) and select the ‘Split’ option. Inside the new window, move the slider to the point where you’d like your partition, but remember to leave at least 20GB of free space with Windows to allow for future software installation. Next, click ‘OK’, followed by the ‘Apply’ button in the top-left of the main window.
PARTITION TIME: Dividing your files from OS and software apps is great, but regular defragmentation is important, too
The partition will now be created and another virtual hard drive will have magically appeared in your Windows Explorer menu for you to transfer your personal files unto.

Clean your hard disk by removing unnecessary files to speed up Windows

Improving your computer’s performance can just be a matter of giving it a spring clean. Leave the feather duster in the cupboard though, as this housework only requires some deft mousework.Click ‘Start > Computer’ and right-click on the hard drive where your Windows files reside (in most cases you’ll find them in the C: drive). Next, click the ‘Properties’ option to display a small window featuring a blue and purple pie chart. Notice the button next to this labelled ‘Disk Cleanup’ – clicking this will reveal various file categories you can cleanse. 
Clean your hard disk by removing unnecessary files to speed up Windows

Generally any item on the list can be ticked for deletion, but give your Recycle Bin a quick once-over to make sure there’s nothing important lurking inside that might be purged accidentally. Leaving the ‘Thumbnails’ box unchecked is also wise, as this saves your computer the trouble of regenerating image thumbnails when you next view your photo albums. Click ‘OK’ and Windows will commence the cleanup, free some computer hard drive space and make your computer run a little faster now it’s shed some of those extra virtual pounds.
To achieve a deeper clean, click the ’Disk Cleanup’ button next the pie chart again, but switch to the More Options tab. The upper ‘Clean up’ button opens the ‘Uninstall or change a program’ window where you can scour your computer for unnecessary software. Abandoned games, disused printer software and unnecessary web browser toolbars are all worth uninstalling. Back on the Disk cleanup window, the lower ‘Clean up’ button will delete Windows System Restore points apart from the most recent, potentially releasing gigabytes of storage space.

Reinstall Windows

Wiping your PC and reinstalling Windows can be the most effective way to boost it


If you’ve tried clearing the clutter, vanquishing viruses and making  performance tweaks, but your computer is still on a go-slow, it’s time to return it to its former glory by reinstalling Windows. This will delete everything from your hard drive though, so if there are any files, emails or even Internet Explorer Favourites you don’t want to lose, it’s essential to back these up. Take a look at the step-by-step guide below to learn how to do this in a little more detail.
Reinstall Windows

Know your reinstalling methods

There are two main methods for reinstalling Windows, but we’ll start with the most common procedure for computers made by companies such as Dell or Acer. These manufacturers often allocate a small area of your hard drive to store a duplicate of the computer’s original Windows 7 data, which can now be used to overwrite any clogged files. 
To access this preserved copy of this operating system, restart your computer and as soon as it begins to fire back up, repeatedly tap [F8] until a menu entitled ‘Advanced boot options’ appears. Select the ‘Repair your computer’ option and press [Enter]. At this point, the computer’s recovery software may start to kick in automatically. If it doesn’t, continue until you reach the stage where you’re required to select your usual account name from a drop-down list and enter the associated password as per normal. You’ll now be met with a list of various options, but the one we’re looking for activates the PC manufacturer’s recovery software and is normally the last link to appear on the list.
START AFRESH It may sound a little drastic, but reinstalling Windows 7 can give your poor old PC a real boost
It’s now a matter of following the specific instructions for your recovery program, but if given the choice between preserving new and changed software or wiping everything back to exact factory specifications, plump for the latter. This way any undesirable digital intruders which may have set up camp on your computer over the years will be evicted. This is the first reinstalling method.


Reinstalling with a disc

The second method for reinstalling it requires a genuine Windows 7 installation DVD, which you may have been given if your PC was built by a low-volume manufacturer. To use this disc, first back up your files then restart your computer, but instead of pressing [F8] on start-up, tap [F12] to load the DVD. When prompted, click the large ‘Install now’ button and continue until you’re asked which type of installation you want. Pick the ‘Custom (advanced)’ option and you’ll now have the choice of where to install it. Choose the partition where the operating system is currently installed (usually the C: drive) and click the ‘Drive options’ link beneath. Double-check you’ve highlighted the correct partition, select the ‘Format’ option and when this finishes, click ‘Next’ for the reinstalling process.You’re nearly ready to enjoy your newly-restored, fighting fit PC, but there are a couple more hurdles to clear. During the set-up process you’ll have to enter your very own product key. This is usually found on a sticker attached to your computer, or on the original packaging of your Windows disc. Finally, once you’re back online, be sure to regularly visit the Windows Update web page to apply essential security updates and add any missing hardware drivers. And this is the second reinstalling method.

Save money by running your PC more efficiently

How mach power do PCs use?

Most desktop computers use between 65 and 250 Watts. Laptops are less demanding and use between 15 and 45 Watts. LCD monitors can use 20 Watts while they're switched on. and even energy-efficient models can still use 2W while on standby. If you're still using an older CRT (cathode ray tube) monltor. It could be using as much as 80 Watts. The more work your PC is doing. the more power it will consume. 50 if you're using lots of peripherals or playing games. your power drain will be greater than if you’re just doing a bit of typing. If you're accessing the intemet. you'll be using more power because more devices and components are being used to send and receive the data.
Save money by running your PC more efficiently

Monitor your energy use

The figures above are just a rough guide.
To get a more accurate measure of how much electricity your PC uses. attach an energy monitor to your mains supply cable. This is very easy and perfectly safe. and you'll be able to see the power consumption of your computer the moment you turn on your PC. You'll also be able to work out how much electricity individual items use - such as your screen or printer. Some energy suppliers provide free monitors with certain tariffs. but you can buy one yourself. OWL (www.theowl.com) has a range of models, priced from around £28. Once you've measured your electricity consumption. you can work out how much you’re paying. See our Mini Workshop below for instructions on how to do this.

Speed up boot up

The main reason we fail to switch off our computers is that it takes a frustrating amount of time to start them up again. Reducing your PC's boot time will encourage other computer users in your household (usually the ones who don't pay the electricity bill) to switch the PC off when they've finished using it.
Start by uninstalling unwanted programs and removing clutter using a program such as CCleaner (www.piriform.com). Then defrag your hard disk using the built-in Windows disk defragmenter or a program such as Auslogics Disk Defrag Free (www.auslogics.com). Slow boot-ups are most commonly caused by a lot of extra programs launching alongside Windows. You can easily remove unwanted auto-starting items using the Startup manager in CCleaner. or a program such as WinPatrol (www.winpatrol.com). Replacing your current mechanical system drive with a much faster $50 will make a big difference and can cut boot up times from several minutes to a matter of seconds. Decent-sized 5505 are getting cheaper. and you can currently buy a 24068 Kingston Technology V300 drive from Amazon for £73. The other benefit of upgrading to an $50 is that they are far more energy efficient than traditional hard drives. A typical hard drive will consume around SW at peak load while an $50 will use less than 2W. 

Turn off your screen

Old fashioned CRT monitors are rare nowadays. but if you still use one, it will be your biggest consumer of electricity by some margin. Modern flat screens are much better. but you should still get into the habit of switching off your monitor when you step away from your computer. Use the off switch rather than just letting it go into standby. Try turning the brightness down. too - you can usually get used to a darker screen fairly quickly. Screensavers were originally designed to protect your monitor from phosphor burn-in. which is a permanent ghostly image on the screen caused by a still image being displayed continuously for a long time. This is no longer an issue with modern monitors. so screensavers serve no real purpose beyond looking nice. Some of the fanciest screensavers can be very processor intensive. keeping your graphics hardware working and your monitor switched on, all of which wastes electricity. 

Make use of power-saving plans

Windows comes with a comprehensive selection of fully customisable power plans. A balanced set-up will suit most users. but you can reduce overall energy consumption by switching to a power-saver plan instead. In windows 7, click Start. type Power Options into the box and press Enter. It's the same in Windows 8.x. except you need to type Power Options on the Start screen and press Enter.

How to hide your tracks on the internet

Staying safe when you're online is more important than ever. These handy tips allow you to avoid its dodgy bits.

How to hide your tracks on the internet

Thanks to the ubiquity of internet connected devices, we’re online more often and in more places than ever. But there is a dark side to this world: cyber criminals want our money, our identities and our information, and they’re often successful in getting them. We’ll show you how to stay safe and cover your tracks when you're online. Of course, you don’t need to cover your tracks if you don’t make any in the first place. Using a PC in an internet cafe is a secure way to browse the internet, providing you don't log in to any sites. Having to go to a specific place to access the internet kind of defeats the point of mobile, unlimited internet access though. Fortunately, most browsers come with incognito or private browsing modes, which mean anything you enter is wiped when the window is closed down.

In Internet Explorer, pressing [Ctrl]+[Shift]+[P] opens an In Private window, while [Ctrl]+[Shift]+[N] opens an Incognito window in Chrome. These modes are particularly useful if you don't want sensitive information such as passwords to be stored by your browser. They’ re also useful for checking out suspicious internet links as they prevent websites accessing personal information.

However, incognito modes won’t stop spyware or malware accessing your keystrokes or passwords. For these you need a robust antivirus package that's kept up to date. It’s a good idea to run scans regularly to stop nasties getting in, and to use any identity protection tools included with the software. 
Google’s internet searches tend to deliver the best results, but at a price the company traclm the things you search for so it can deliver relevant adverts to you. If you’re not happy about this, you can use Duck Duck Go’s (http://duckduckgo.com) search to find what you’re looking for without being tracked. We’ve found it to be as accurate and useful as Google.

How to make an Internet Explorer super homepage

Make your Internet Explorer homepage the best place to be by adding all your favourite websites. You’ll find it more useful than ever.


When you open Internet Explorer, the first site you see is your homepage.This could be the site that your PC manufacturer put on there, or it could be one you've subsequently chosen yourself. If you visit lots of the same sites regularly as many of us do rather than typing each URL into the address bar every time you want to open them up, or laboriously finding them from your Favorites list, you can create a homepage which opens your best-loved websites automatically when you start up Internet Explorer. These sites will be displayed as tabs along the top of the window, or they can be viewed as large thumbnails, which you simply click on. 
It's easy to create a homepage featuring all your favourite sites in individual tabs, and it will save you lots of time and effort. 
Once you've done it you'll wonder how you ever lived without it!
download Internet Explorer latest version

Download the latest version

Download the latest version
To create a multi-tab homepage, you’ll first need to make  sure you’ve downloaded the latest version of Internet Explorer  unless you’re already using it. You can download it free from http://windows.microsoft.com/en-gb/internet-explorer/download-ie. The installer will guide you through each step of the process. Once it’s done, you’re ready to open Internet Explorer and move on to the next step. 

 
Select homepages that you want to use

Select homepages that you want to use
Start by selecting all of the websites you’d like to see open on your homepage. The easiest way to do this is to choose your preferred sites from the ones that you’ve saved in your Favorites folder. Click on the ‘Favorites’ folder at the top of the Internet Explorer toolbar, right-click on any website you want to include and click on ‘Open in new tab’.

 
Create a homepage of tabs

Create a homepage of tabs
Click on the cog to the right of the little ‘Favorite’ icon in the top toolbar of Internet Explorer and select ‘Internet Options’. When a new window appears, click on ‘Use current’ underneath the Homepage area, and Internet Explorer will automatically add all your current tabs as homepages. Now just click ‘OK’ to set these pages to your homepage. 

Add single tabs to your homepage

Add single tabs to your homepage
You can add more tabs at a later date without the hassle of creating a new homepage simply by adding single tabs to your current homepage. Just click on the cog to the right of the Favourite icon once more, and underneath the area where it says Homepage, click ‘Use new tab’, enter the name of your additional
site and click ‘OK’. 

Remove website tabs

Remove website tabs
Likewise, if you get bored of any of the sites on your homepage, you can remove single tabs just as easily without having to start from scratch. Again, underneath the Homepage area, just delete tabs you don’t want to see any more and click ‘OK’. If you want to remove them all, just select all the websites and delete them – easy!

Save your homepage

Save your homepage
If you’re planning to create more than one homepage of websites, it’s a good idea to save each of these to your Favorites, so you can swap between them when you like. Click on ‘Favorites’ in the toolbar, click on the arrow to the right of the ‘Add to Favorites’ button, select ‘Add current tabs to Favorites’ and choose a name to easily distinguish between homepages. 

Quickly manage tabs

Quickly manage tabs
There are lots of handy shortcuts available in Internet Explorer, and if you’re planning to use tabs a lot when browsing, learning them will save you valuable time. Our favourites are [Ctrl]+[T] to open a brand new tab, while [Ctrl]+[W] closes the currently open tab. Alternatively, you can switch between your open tabs by using the [Ctrl]+[Tab] keys.

You’re all done

You’re all done Congratulations – you’ve created a homepage that displays all your favourite sites as soon as you open Internet Explorer, no typing required. You’ll no longer have to waste precious time opening tabs and browsing to the sites that you use every day. One final word of warning, though: don’t choose too many websites as this can slow down your computer.

Speed up your PC in 5 minutes

ReadyBoost is a free way to speed up your system using a USB stick, and it’s great for extending the life of your PC. Here’s how to make the most of it!


Speed up your PC in 5 minutes
here’s little more frustrating than realising your once speedy computer, which served you well just a few months ago, is starting to feel slow and unresponsive. Don’t worry though – you don’t need to fork out for an upgrade yet. You can turn to page 72 for our top 10 tips and tricks for recovering lost performance, but  Windows also offers a quick and easy solution. ReadyBoost is an extremely useful built-in tool that uses removable flash memory, such as USB sticks and SD cards, as extra RAM to speed up your system. In Windows 7 or 8, the amount of memory that can be used for ReadyBoost has been given a huge increase, and you can now use more than one form of removable memory, giving you extra scope to speed up your machine. It’s particularly useful for systems running with less than 2GB of RAM, such as netbooks.

 
1/ Insert your USB stick

Insert USB stick
First, make sure that you have your choice of removable flash memory to hand. To start the ReadyBoost process, you need to insert your USB stick into your computer and wait for the AutoPlay menu to appear. If you’re opting to use an SD card instead, just place it into the slot on your laptop or desktop PC, or use an external card reader.

2/ Choose ReadyBoost

Choose ReadyBoost

Once the AutoPlay window pops up, you can start using ReadyBoost. The relevant option appears at the bottom of the list, where you’d normally choose to either browse the device or load images from an SD card straight into Windows Live Photo Gallery. When you click on the ‘Readyboost’ option, you’ll be taken straight to a configuration screen.

3/ Create a dedicated device

Create a dedicated device
If you’re planning on using this USB flash drive just for ReadyBoost and don’t intend to store any data on it as well, you should turn it into a dedicated device. To do this, simply check the second option in the list, ‘Dedicate this device to ReadyBoost’. This option makes all of the USB drive’s storage space available to be used by Windows.

4/ Prepare it for use

Prepare it for use

Now that your USB stick is a dedicated device, it’s ready to give your computer the performance boost it so badly needs. Click ‘OK’ and your device is prepared for use by the system. From now on, whenever you insert that drive into your PC, Windows recognises it and adds its capacity to the system, so your computer has more memory to use.

5/ Partition a USB device

Partition a USB device
If you still want to be able to use your USB stick’s memory for storing your documents, photographs and other files, but you also need to speed up your computer, a different option is required. This will have a less dramatic effect than making it a dedicated device, but can still be helpful. Insert your USB stick or SD card and click the ‘Speed up your system’ option as before.

6/ Slide to increase

Slide to increase

You can use the slider to allocate a portion of the disk’s space to ReadyBoost, while still leaving a certain amount of room for your files. Move the slider left or right until you’re happy with the amount of space. We wouldn’t recommend dedicating less than 256MB to ReadyBoost, otherwise you won’t see much difference in the speed of your system.

 
7/ Double up

Double up

In Windows Vista, ReadyBoost only supported one device with a capacity up to 4GB, but with Windows 7 or 8 you can use multiple fast devices, with nearly unlimited memory. If your laptop or desktop computer has an SD card that’s unused for the majority of the time, why not consider making this a semipermanent ReadyBoost slot?


8/ Enjoy!

Enjoy
You should now have a noticeably more responsive computer, and be able to perform daily tasks faster than before. Although Readyboost won’t help you transform a basic machine into a gaming behemoth, you should feel a real change in your system’s performance, and it might even stave off the need for a new computer for a little while to come.

How to manage your files quickly and easily

Take the stress out of file management by letting DropIt organise and process selected files and folders speedily, simply and automatically.

How to manage your files quickly and easily

DropIt is a tiny free tool that’s designed to speed up common file and folder operations such as copying, moving, renaming and encrypting. You can set it up to monitor selected folders automatically, or manually drag files and folders on to the DropIt icon, which floats above all other windows on the desktop.
DropIt uses a series of ‘associations’ to select files, filtering them by name, type or even properties. It then performs a specific action on the selected files, which you can customise to suit your personal needs. You can set up multiple associations covering a wide range of files and types, and even organise your associations into profiles for specific tasks. If you regularly find yourself performing the same file-based tasks over and over again, you’re going to love DropIt.

 
1. Set up DropIt

Install DropIt from the cover disc, or download and run the portable version from www.dropitproject.com. If installing, tick ‘Launch DropIt’ at the end of the setup before clicking ‘Finish’. You’ll see an arrow appear on-screen – this is the DropIt tool, which floats on-screen above other windows. Click on it and drag it somewhere less distracting – a right-hand corner, for example.

2. Your first association

Your first association

DropIt works by creating ‘associations’ that process files based on a set of rules. For our first example we’re going to create a simple association that moves any JPG file dragged on to the DropIt icon to your Pictures folder. First, locate a JPG file and drag it on to the DropIt icon. Click ‘Yes’ when prompted, then give it a suitably descriptive name to help you identify it.

3. Verify rules and action

Verify rules and action

You will notice that the Rules box is already pre-filled with *.JPG, indicating that the association will only apply to files whose names end in .JPG. Click the ‘Action’ drop-down menu to see a list of all 18 actions you can perform using the program. As this rule is designed to simply move all JPG files that are dragged on to the DropIt icon to your Pictures folder, leave ‘Move’ selected for now.

4. Complete action

Complete action

Click the folder button next to Destination Folder to select your Pictures folder (if you try to select your Pictures library, DropIt will simply create a Pictures folder on the desktop for your files), then click ‘Save’. You’ll notice that the association isn’t performed immediately – instead, click the ‘Play’ button and the file will be magically moved. Test it with another JPG file.

5. Create second association

Create second association

Right-click the DropIt icon and select ‘Associations’ to manage existing associations and create new ones from scratch. You’ll also see a Default drop-down menu. Clicking this reveals that DropIt supports profiles, allowing you to organise and switch available associations depending on specific circumstances. We’ll cover those later – for now, click ‘+’ to create another association.

6. Apply more complex rules

Apply more complex rules


Each rule uses a set of filters to determine which files or folders to process. Click the ‘i’ button next to the box to see examples of filters you can create based on the file or folder name. Use the * character as a wildcard for files, and ** characters for folders. Use the / character to exclude items. To apply multiple filters, separate each one with either a semi-colon or | character.

7. More filter options

More filter options

You can also apply filters based on file properties, attributes and even file content. Click the funnel button next to the ‘i’ button to choose these. Tick a filter to enable it, then click the ‘>’ dropdown menu to make the filter apply when the file is greater than (>), equal to (=) or less than (<) the given attribute. File content lets you match based on words or text strings.

8. Actions: compress

Actions: compress

Click the ‘Action’ box to reveal different actions you can perform on a file – one action can be performed per association. Use ‘Compress’ to pack together all the files selected by the filter into a single archive file, for example. Note how the final box changes depending on what option you select – for compressed files, click ‘Configure’ to choose an archive type, for example.

9. Actions: rename

Actions: rename

The Rename option is good for quickly renaming digital camera photos that have unhelpful filenames, such as GEDC0500.jpg. After selecting ‘Rename’, click the book icon next to the file name to reveal a list of options that can be inserted into the renamed filename. Select ‘Images’ to see a list of naming options including file dimensions and the date when the photo was taken.

10. More actions

More actions


Other handy actions include creating image galleries, music playlists and shortcuts, changing a file’s properties, or even ignoring it altogether. The latter option is best used for creating exclusion filters, so files matching the rule are immune to any other associations you’ve set up. To make this work, click the star button next to its name to prioritise it over other associations.

11. Use profiles


DropIt supports profiles – collections of related associations that can be applied for specific purposes. The program includes a number of profiles with pre-built associations for a variety of uses, including creating music playlists and compiling text lists of files. To switch profiles, right-click the DropIt icon and select your  profile from the Profiles drop-down menu.

12. View profile associations

View profile associations

You’ll see the DropIt icon change to the profile icon that’s been selected to help identify which one you’re using. To see what associations this profile performs, right-click the icon and choose ‘Associations’. You can transfer any of these to another profile: right-click one and select ‘Copy to’ to do so. Select another profile from the drop-down menu to view its associations.

13. Manage profiles

Manage profiles

To set up and manage profiles, right-click the DropIt icon choose ‘Profiles > Customize’. Click ‘+’ to create a new one. Give it a suitable name, then click the ‘Search’ button to pick the icon DropIt will use when the profile is selected. Alter its dimensions to change its size and use the Opacity slider to adjust transparency, if required. Click ‘Save’ when you’re done.

14. Monitor folders

Monitor folders

To have DropIt monitor folders automatically, right-click the DropIt icon and choose ‘Options > Monitoring’. Tick ‘Enable scan of monitored folders’, then click ‘Add’ to choose a folder using the folder button. Select the profile whose associations you want to process on any files in the selected folder and click ‘Save’. Repeat for any additional folders you wish to monitor.

Top